
Using Okta as Identity Provider
As an alternative to Azure as Identity Provider, Routty now supports Okta, through SAML and federated domains.
This page guides you through the different steps taken in order to setup this integration.
What needs to be set up
Azure AD (Entra ID): add & verify your domain, then mark it Federated.
Okta: a SAML 2.0 app that issues SAML to Azure.
DNS: a TXT record to verify the domain in Azure.
Users: created as members in Azure with a stable ImmutableId, and the same value sent from Okta as NameID.
You cannot federate *.onmicrosoft.com or a subdomain. Use a domain you own (e.g., customer.com).
The authentication flow to be setup
Prerequisites
People
Azure admin
Okta admin
DNS admin for custom domain
Data
Note down the Azure tenant-ID
The Routty Azure tenant could be used. Please contact our support if this is the desired approach.
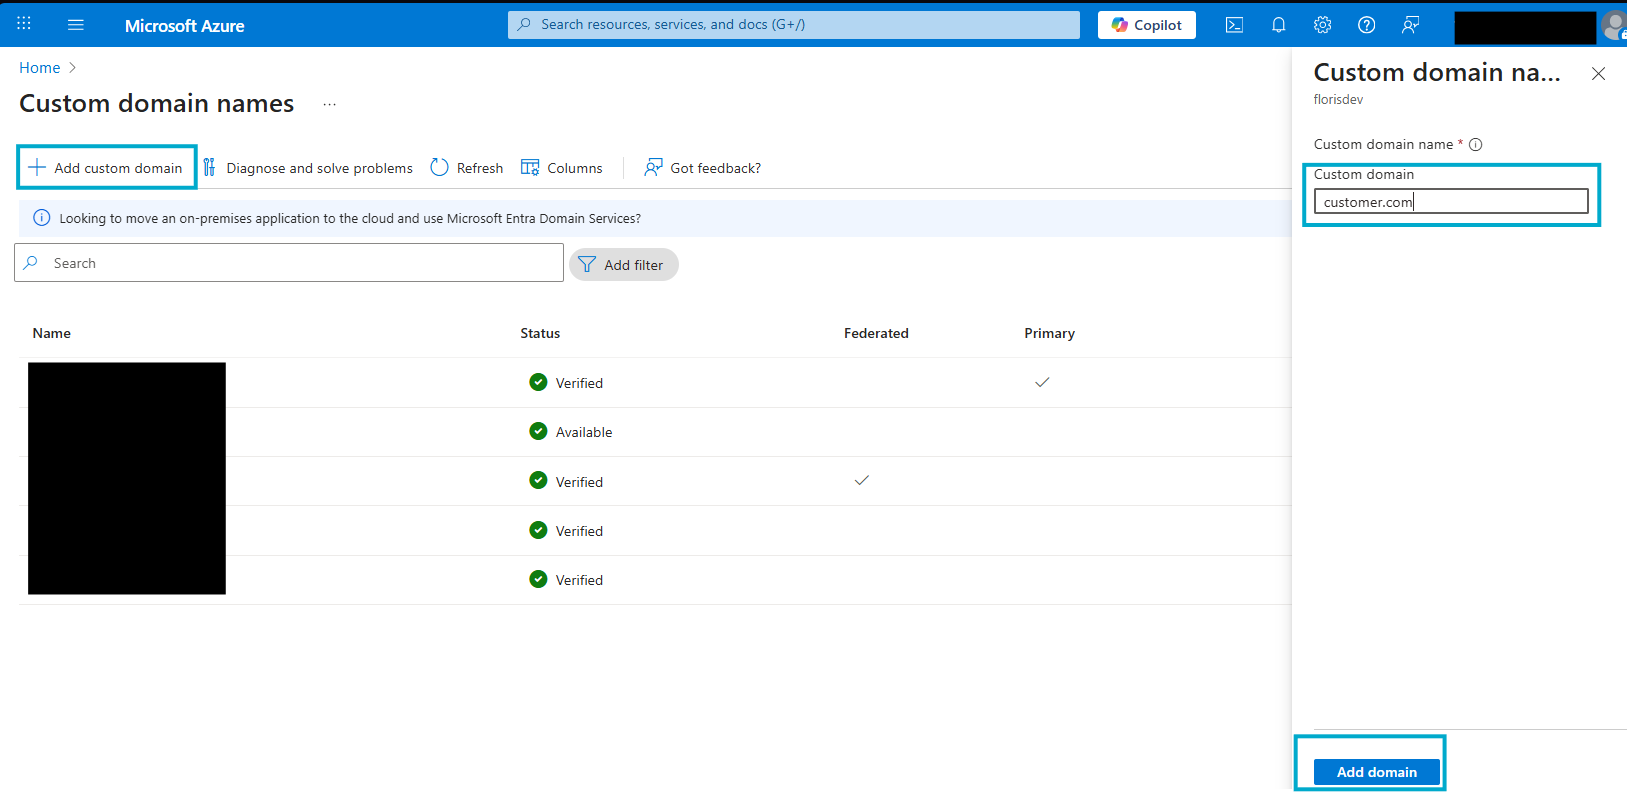
Step 1: DNS — add & verify the domain in Azure
To be done by the Azure admin and DNS admin
Azure Portal → Entra ID → Custom domain names → Add custom domain.
Enter your domain (e.g.,
customer.com).
Azure shows a TXT record (like
MS=ms########).
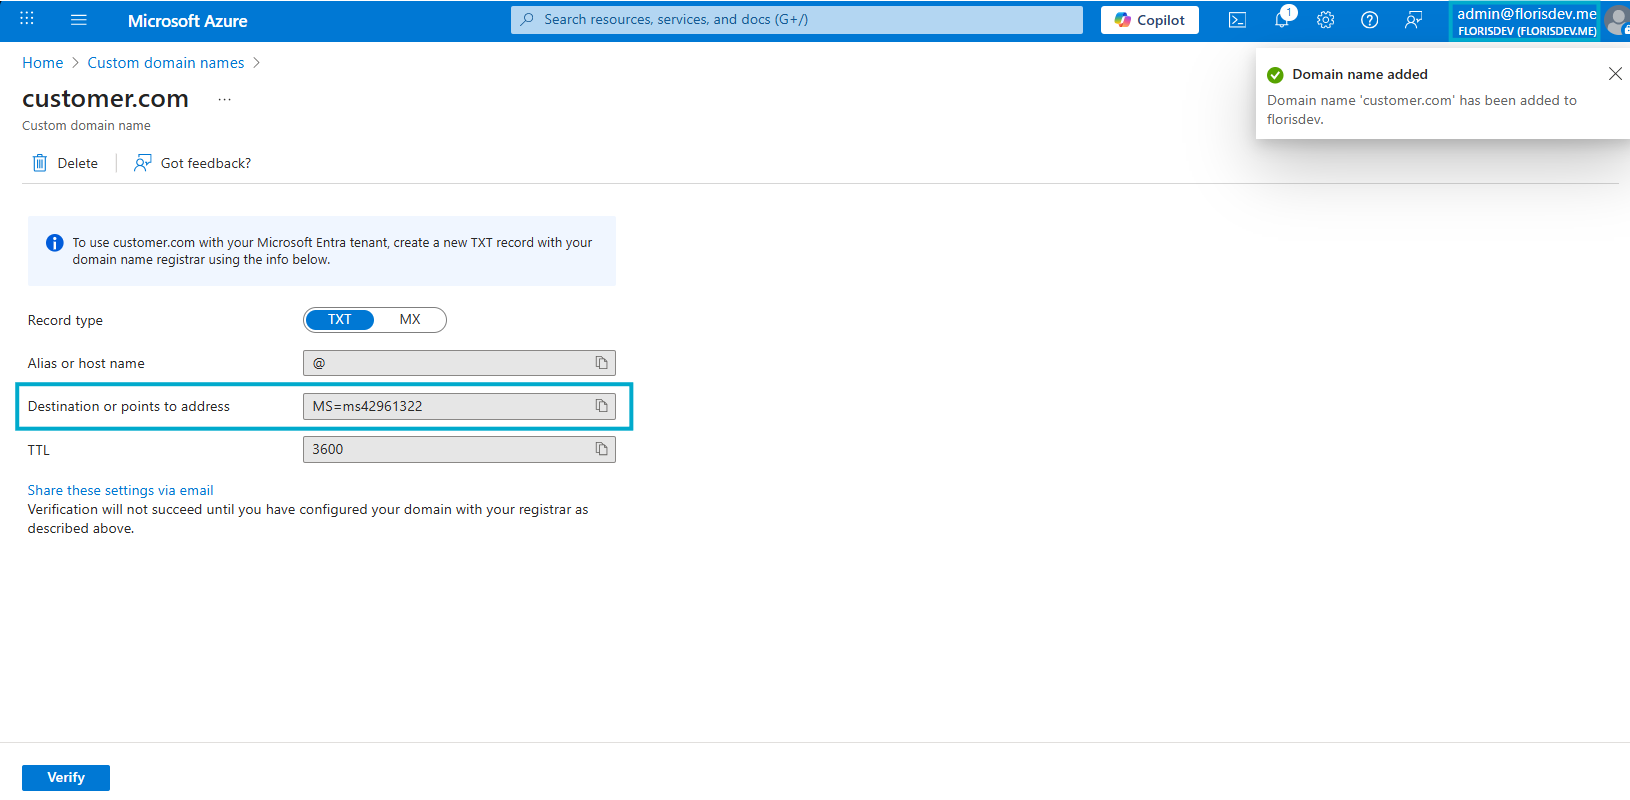
In your DNS provider, create:
Type: TXT
Host/Name:
@Value: the
MS=...string
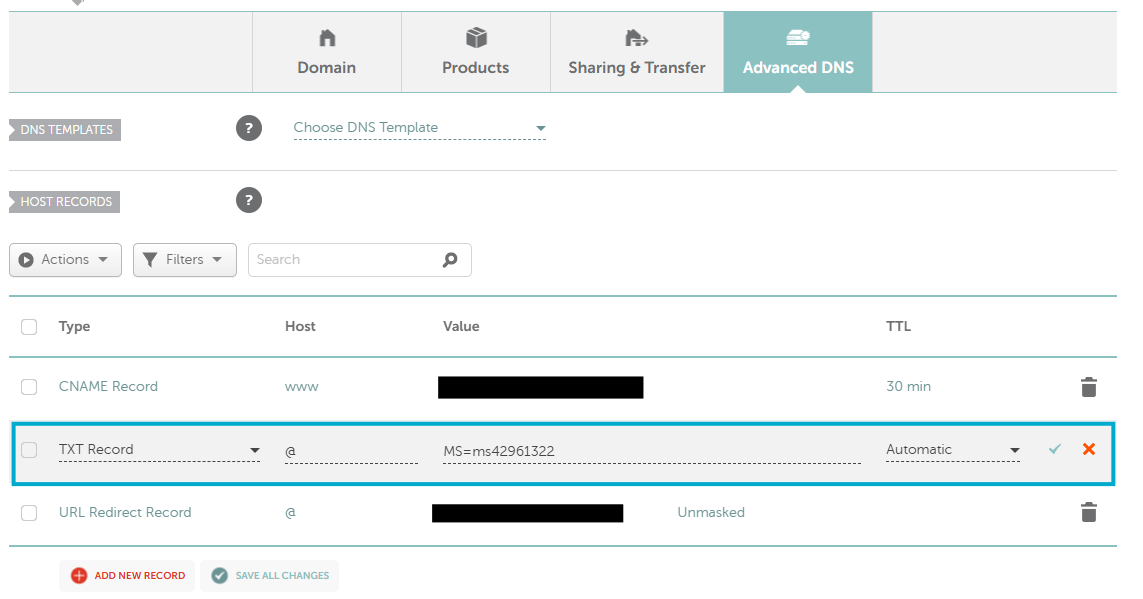
Wait for DNS to propagate, then click Verify in Azure.
Step 2: Okta — create the Generic SAML 2.0 app for Azure
To be done by the Okta admin
Info needed:
Azure tenant ID
Okta Admin → Applications → Create App Integration → SAML 2.0.
General Settings
App name: Azure Routty
App visibility: Do not display application icon to users
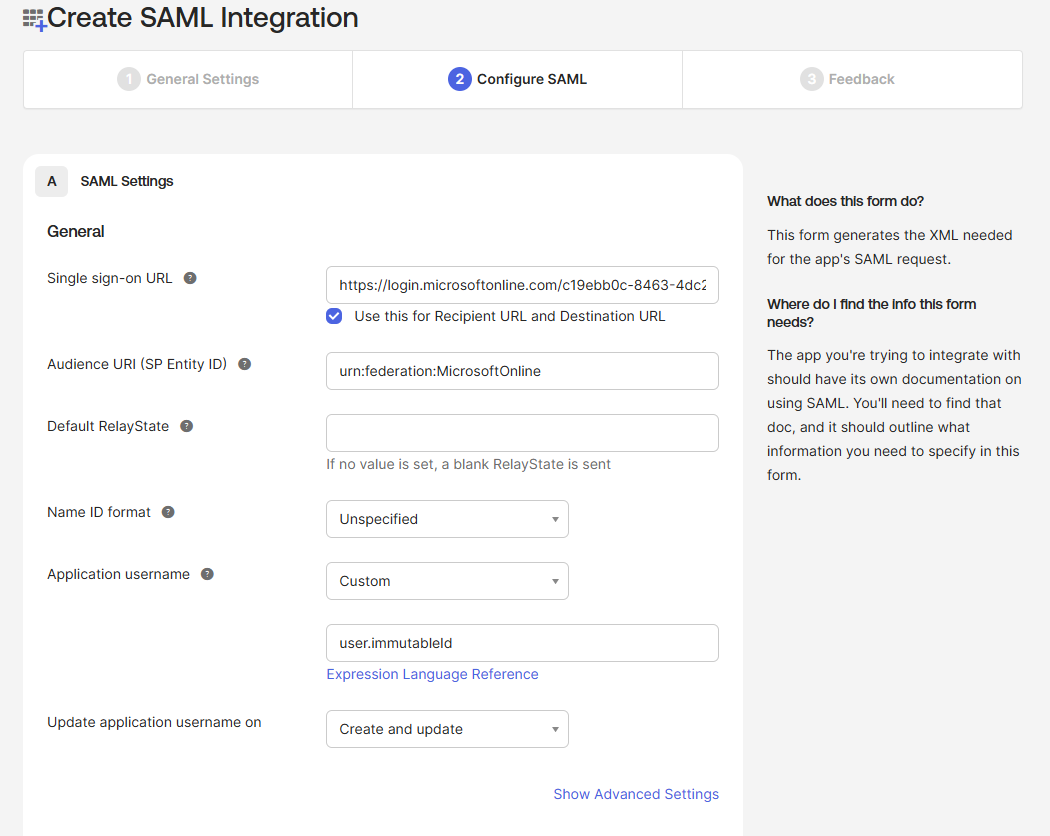
SAML Settings:
Single sign-on URL:
CODEhttps://login.microsoftonline.com/<AZURE_TENANT_ID>/saml2Audience URI (SP Entity ID):
CODEurn:federation:MicrosoftOnlineName ID format: Unspecified
Application username: Custom →
user.immutableId
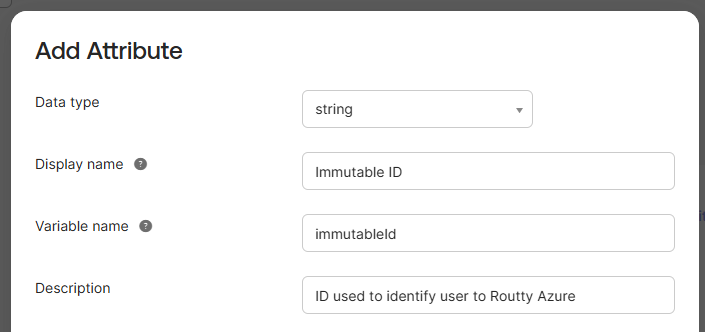
Add an attribute to the Okta user profile:
Directory → Profile Editor → User (default) → Add attribute
Display name:
Immutable IDVariable name:
immutableIdData type: string
Description: ID used to identify user to Routty Azure
For each user who will sign in via Azure, set immutableId, see step 4.
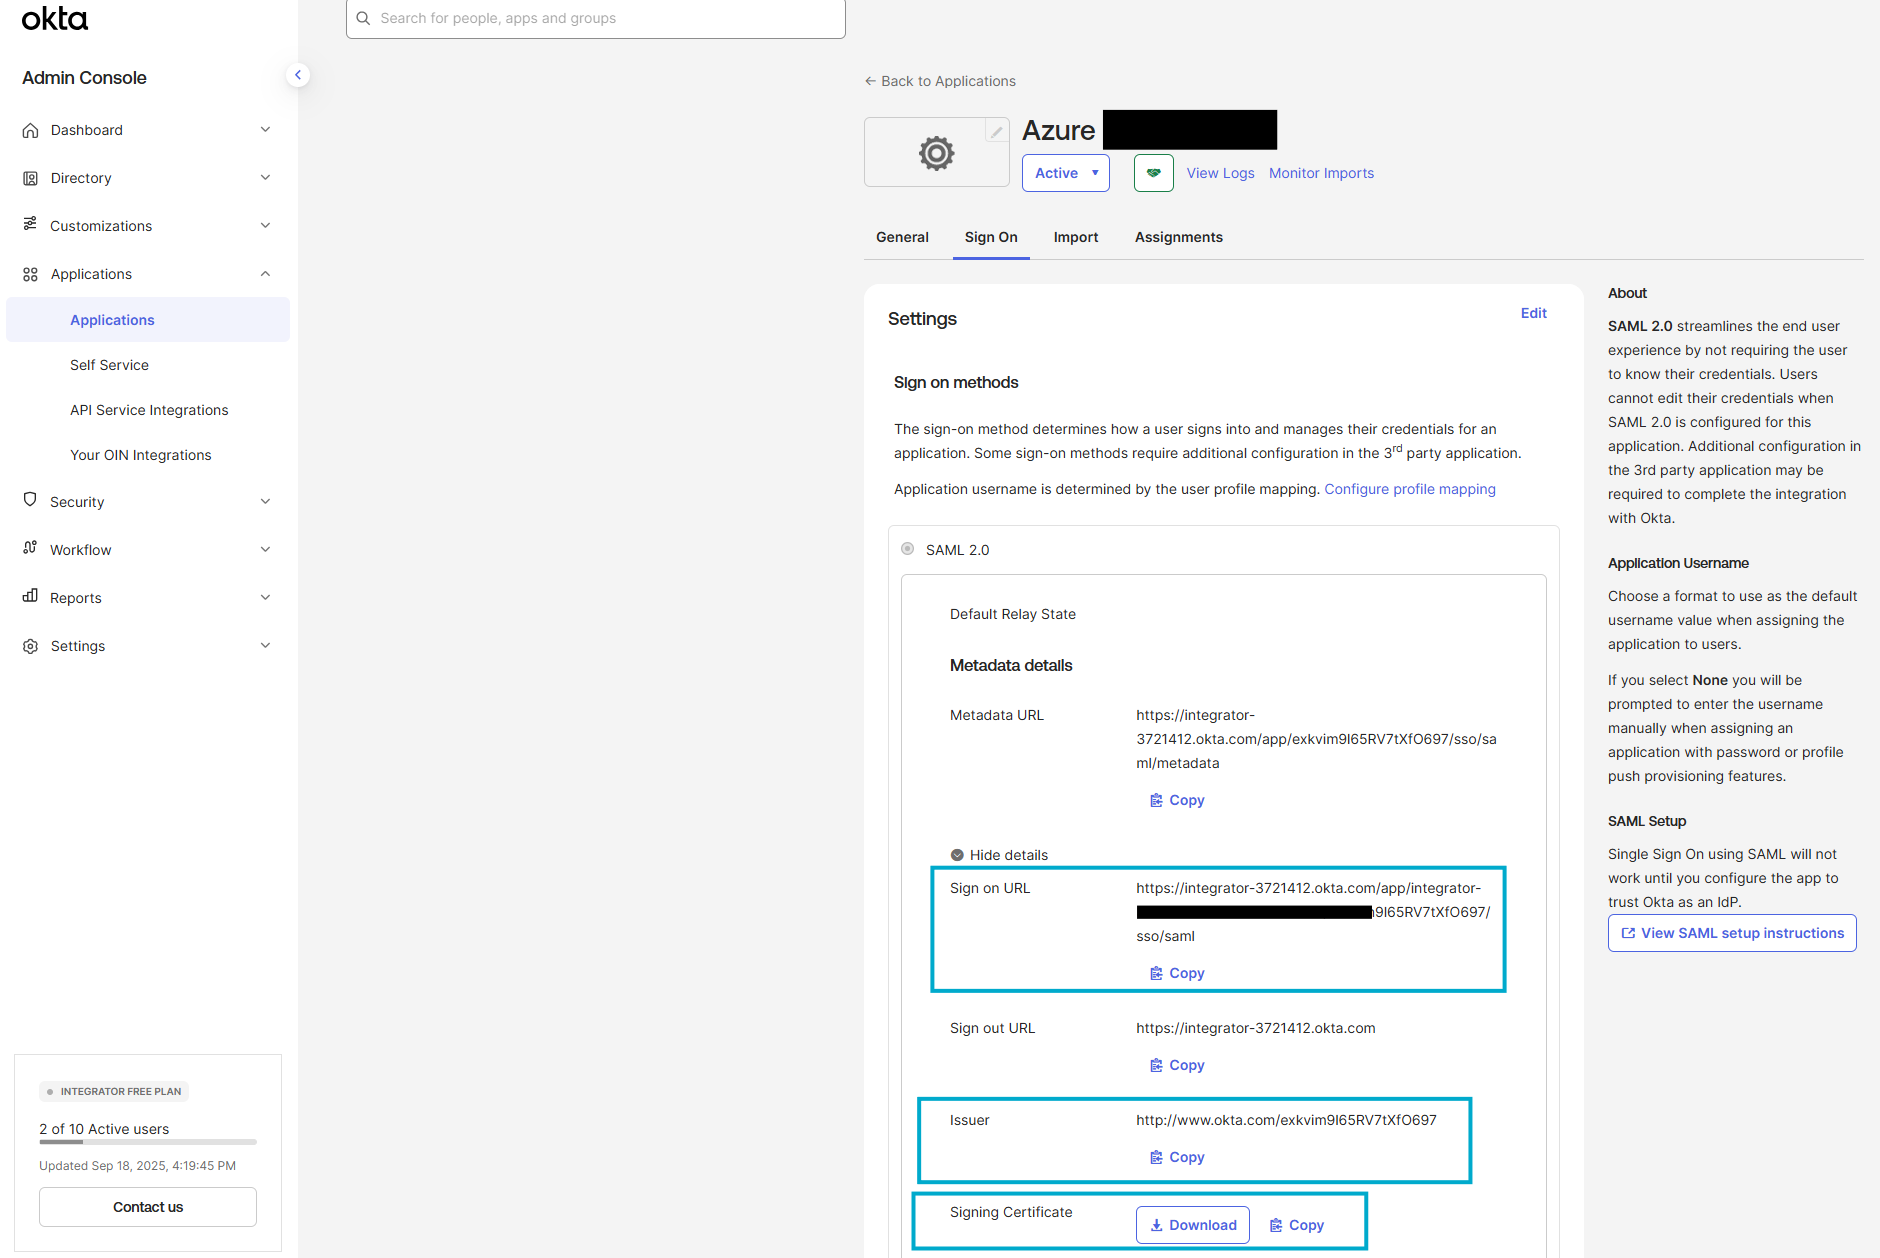
Grab and share the following info:
Sign on Url
Issuer
Signing Certificate
Step 3: Azure — federate the domain to Okta
To be done by the Azure admin
Info needed:
Okta Sign on URL (Step 2)
Okta Issuer (Step 2)
Okta Signing Certificate (Step 2)
Important: Read Before You Federate the Domain to Okta
Federating a domain changes how all Microsoft sign-ins for that domain are handled. Review this carefully to avoid lockouts or outages.
Blast radius: After federation, any user signing in as
user@customer.comto Azure AD / Microsoft 365 is redirected to Okta. Microsoft-managed passwords for that domain stop working for M365/Azure sign-in.Keep a break-glass path: Ensure you have at least one Global Admin on a Managed domain (e.g.,
admin@tenant.onmicrosoft.com) that is excluded from Conditional Access. Test that account before flipping the domain.Certificates & rotation: Azure trusts the Okta SAML signing certificate you upload. Track its expiry and have a rotation plan (update Azure before rotating in Okta to prevent downtime).
What’s not affected: Apps that authenticate directly to Okta (SAML/OIDC) are unchanged. Federation only affects Microsoft sign-ins.
The following tasks are to be performed from an admin PowerShell terminal. This uses Microsoft Graph PowerShell.
3.1 Install & connect
Install-Module Microsoft.Graph -Scope AllUsers
Connect-MgGraph -Scopes "Domain.ReadWrite.All","Directory.AccessAsUser.All"
3.2 Prepare the Okta signing certificate in Base64
Replace
"C:\okta.cer"with path to the Okta Signing Certificate
$cert = New-Object System.Security.Cryptography.X509Certificates.X509Certificate2("C:\okta.cer")
$certB64 = [Convert]::ToBase64String($cert.RawData)
3.3 Create the federation configuration
Replace
customer.comwith the customer domainReplace
<https://<your-okta-domain>>/app/<OktaSamlAppId>/sso/samlwith the Okta Sign On UrlReplace
<http://www.okta.com/<yourOrgExternalKey>>with the Okta Issuer
New-MgDomainFederationConfiguration -DomainId "customer.com" `
  -DisplayName "Okta Federation" `
  -PassiveSignInUri "https://<your-okta-domain>/app/<OktaSamlAppId>/sso/saml" `
  -IssuerUri "http://www.okta.com/<yourOrgExternalKey>" `
  -SigningCertificate $certB64 `
  -PreferredAuthenticationProtocol saml `
  -FederatedIdpMfaBehavior acceptIfMfaDoneByFederatedIdp
3.4 Flip the domain to Federated
Replace customer.com with the customer domain
Update-MgDomain -DomainId "customer.com" -AuthenticationType Federated3.5 Verify
Replace
customer.comwith the customer domain
Get-MgDomain -DomainId "customer.com" | fl Id,AuthenticationType
# Expect: AuthenticationType : Federated
Step 4: Users — create member users with ImmutableId
To be done by the Azure admin
Info needed:
List of user
Because the domain is Federated, users with that suffix are members, not guests, and must have an ImmutableId (a stable “SourceAnchor”).
4.1 Generate a base64 anchor (per user)
$immutableId = [Convert]::ToBase64String([Guid]::NewGuid().ToByteArray())
$immutableId
4.2 Create the Azure user (member) with that anchor
Replace user information with actual user information
Do not change
passwordProfilethis password will not be used. (Okta authenticates the user)
$newUser = @{
  accountEnabled            = $true
  displayName               = "Test User"
  mailNickname              = "test"
  userPrincipalName         = "test@customer.com"
  onPremisesImmutableId     = $immutableId
  passwordProfile           = @{ password="Temp123!"; forceChangePasswordNextSignIn=$false }
}
New-MgUser -BodyParameter $newUser
4.3 Set the same value in Okta
To be done by the Okta admin
Info needed per user:
immutableId
Open the Okta user → Edit Profile → immutableId = the same base64 string.
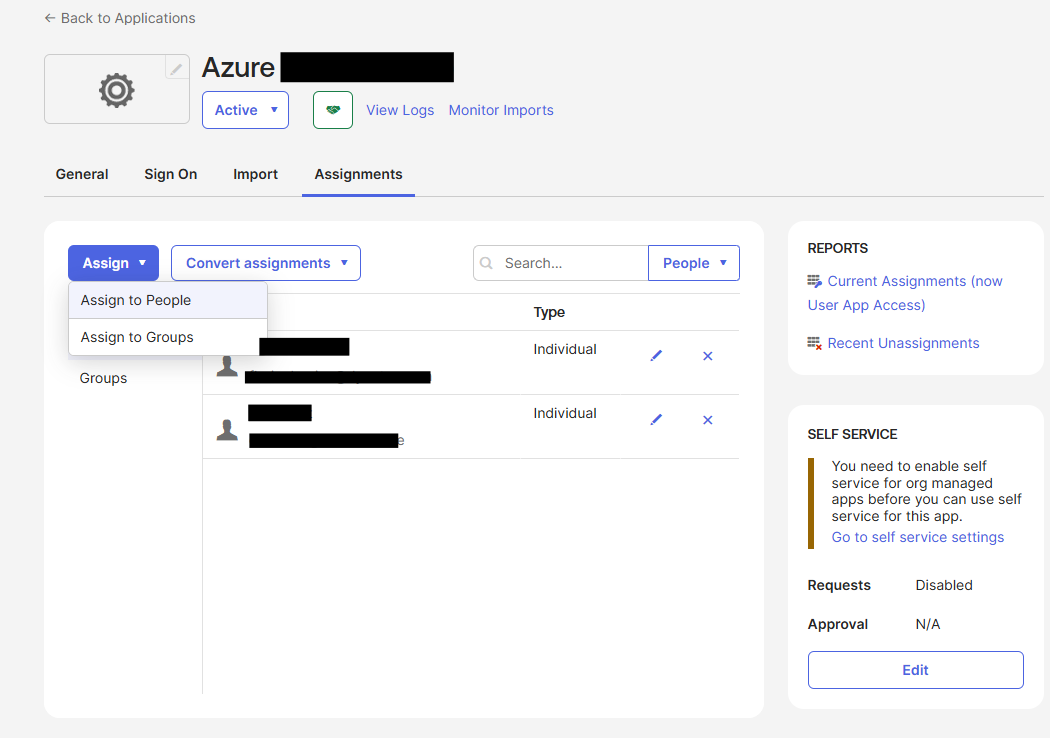
Assign the user to your Azure SAML app.
Okta will send NameID = immutableId and Azure matches it to the user’s onPremisesImmutableId.
NB: Each user should have their own unique immutableId.
Validate & troubleshoot
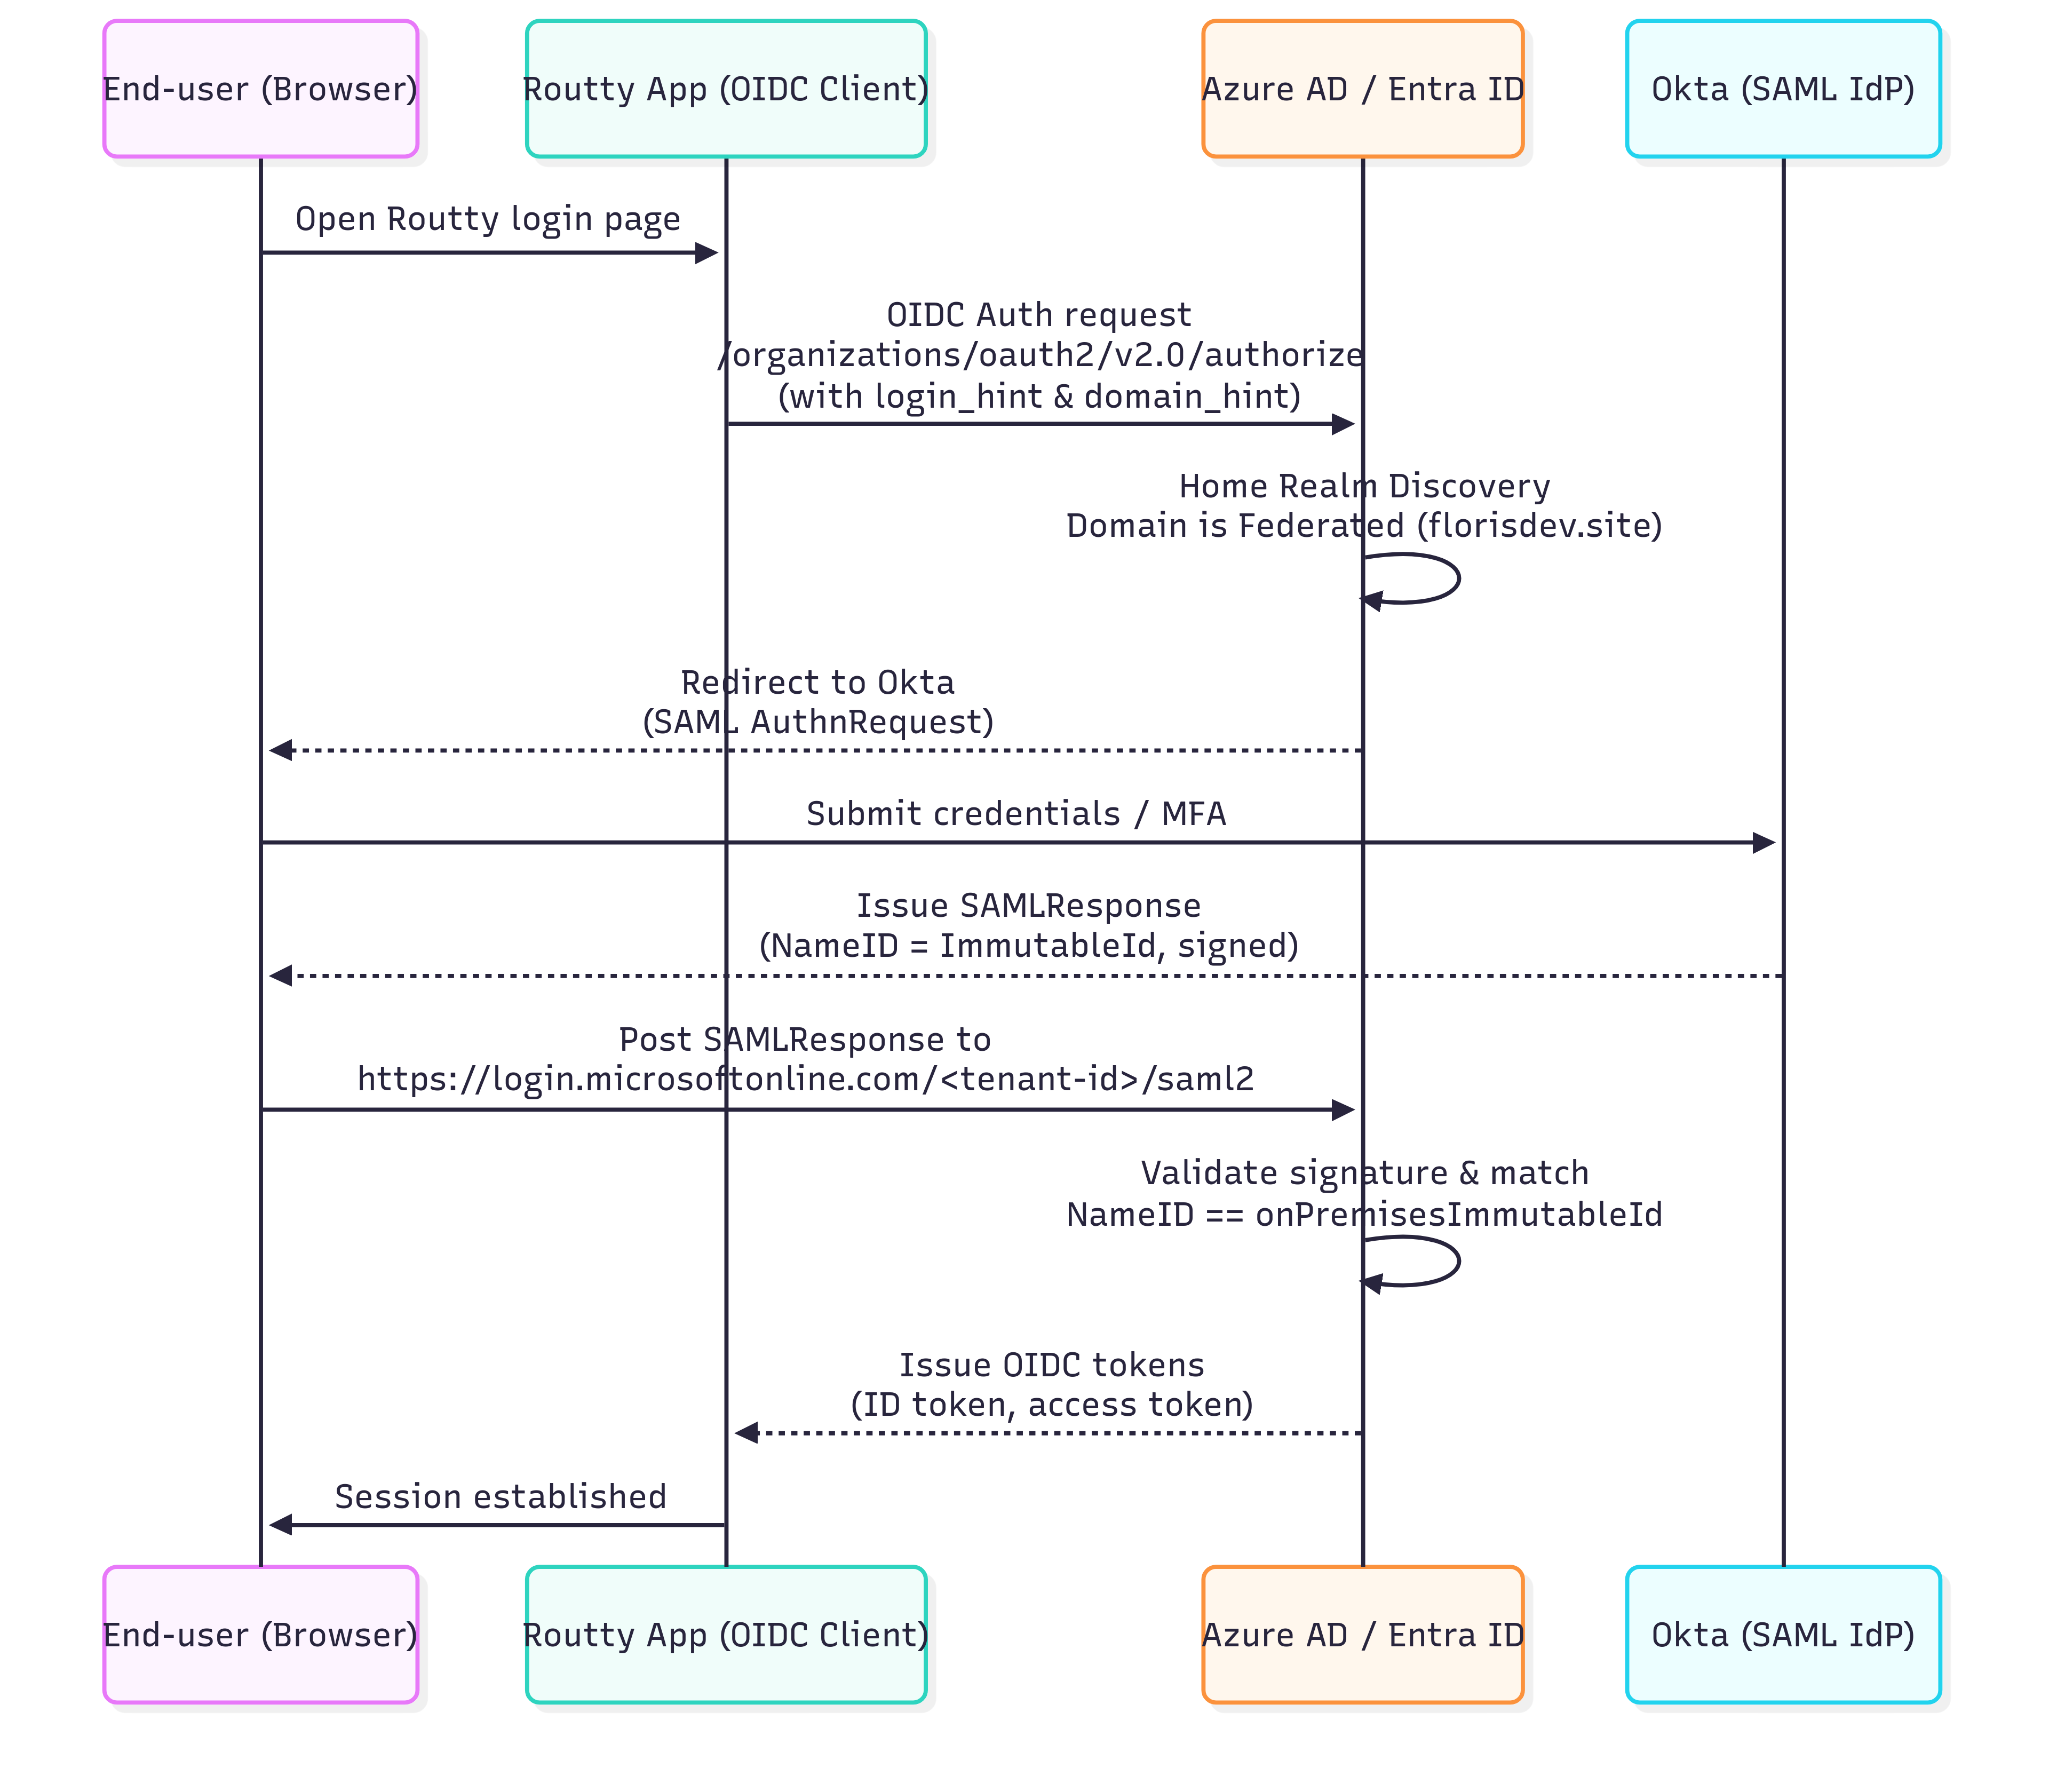
You should see this sequence:
Azure routes to Okta (because the domain is Federated).
Okta authenticates and posts SAML to
https://login.microsoftonline.com/<tenant-id>/saml2.Azure validates the signature & matches NameID ⇔ onPremisesImmutableId → issues tokens → back to Routty.
If anything breaks:
AADSTS90019 (no tenant): the SAML NameID value doesn’t match any user’s
onPremisesImmutableIdin Azure—check both sides for an exact base64 match.AADSTS50034 (user not found): the SAML NameID value doesn’t match any user’s
onPremisesImmutableIdin Azure—check both sides for an exact base64 match.See Microsoft password page instead of Okta: domain isn’t Federated (check
Get-MgDomain) or you’re signing in with a different domain suffix.
Behind the scenes
When your users log into Routty with a federated domain (e.g. user@customer.com), several systems cooperate to authenticate them securely. Here’s what happens step by step:
User starts at Routty
Routty is an OIDC client that talks to Azure AD (Entra ID). When a user clicks “Login,” Routty redirects their browser to Azure’s/organizationsauthorization endpoint.Azure determines the home realm
Azure inspects the user’s email domain (@customer.com). Since that domain is configured as Federated, Azure doesn’t prompt for a Microsoft password. Instead, it generates a SAML AuthnRequest and redirects the user’s browser to the customer’s Okta tenant.User authenticates at Okta
Okta handles all credential entry and MFA based on the customer’s security policy. Once authentication succeeds, Okta issues a signed SAMLResponse with the user’s ImmutableId in the<NameID>field.Azure validates the SAMLResponse
The SAMLResponse is posted back to Azure at the tenant-specific ACS endpoint (.../saml2). Azure verifies the Okta signing certificate, then matches the<NameID>to theonPremisesImmutableIdof a member user in its directory.Tokens issued back to Routty
Once the match succeeds, Azure completes the OAuth2/OIDC flow, issuing an ID token and access token back to Routty. From Routty’s perspective, it’s just a normal Azure AD login.Session established
Routty validates the ID token, creates a session, and the user is logged in — no Microsoft password was ever needed.